If you use LinkedIn, you are pretty much familiar with their inbox: it's a stack of threads which works well enough if you reach out to a few people every now and then.
But if you are using LinkedIn more heavily, you might notice that managing the inbox becomes quite a problem. And the problem is that there is no way to organize your sent messages vs your incoming messages.
So if you need to reply to several people, you have to scroll down to them and reply. Easy, right? The problem is that as soon as you do that, this thread jumps to the first position and you have to scroll down again to reply to the next person.
This becomes a mess fairly quickly.
A possible workaround is to scroll through all the threads and open each of them in a separate window. Now we've got a bunch of windows opened which is a different problem to manage. Meh...
But isn't there a better way?
Separate incoming vs sent messages
So if we could separate our incoming messages from the sent ones, we could easily keep track of what's going on and make sure that the important conversations got a reply.
This is where free software called Asana comes in handy. The instruction below describes how to utilize Asana for creating your custom LinkedIn inbox.
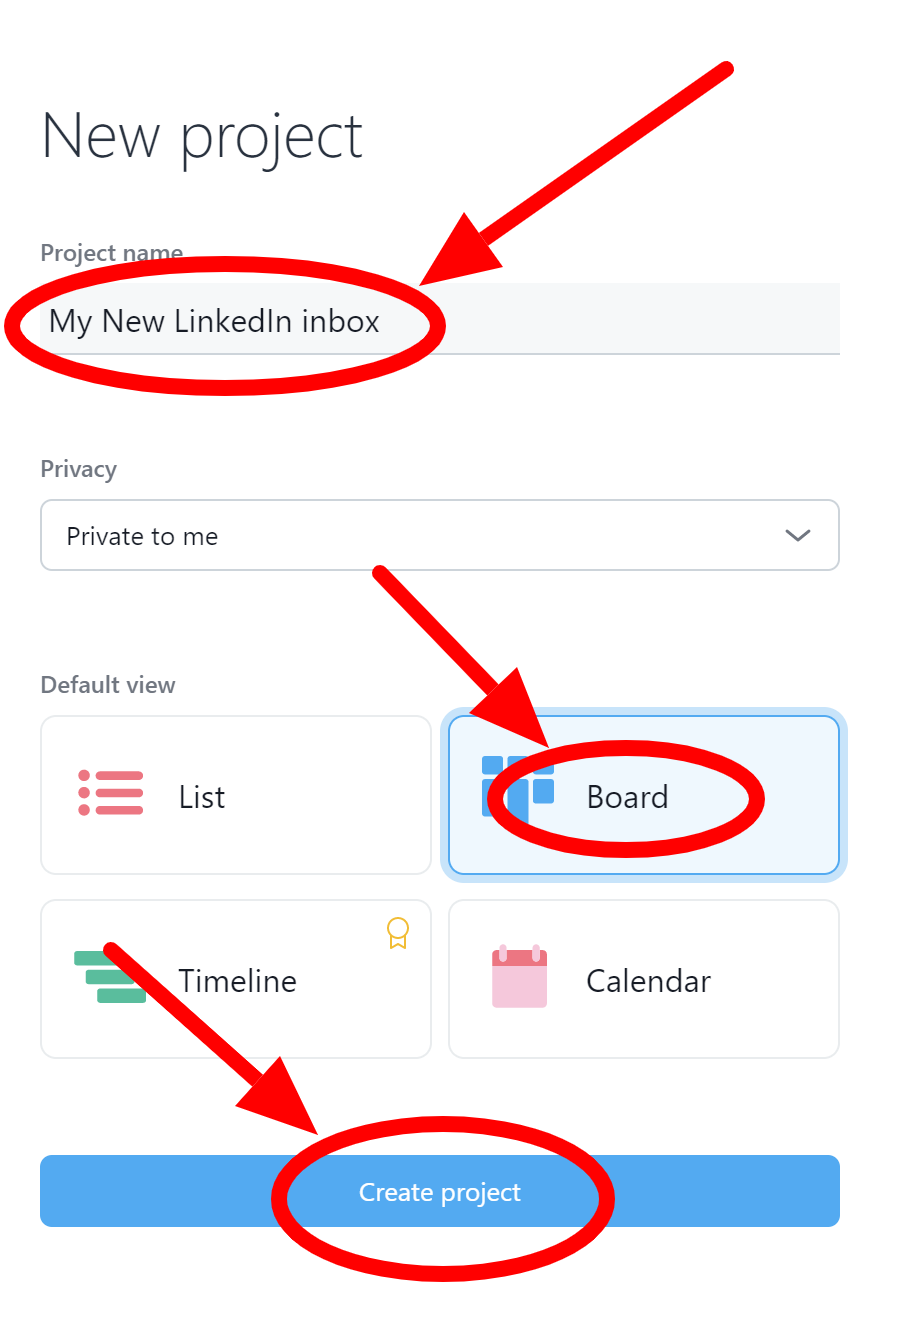
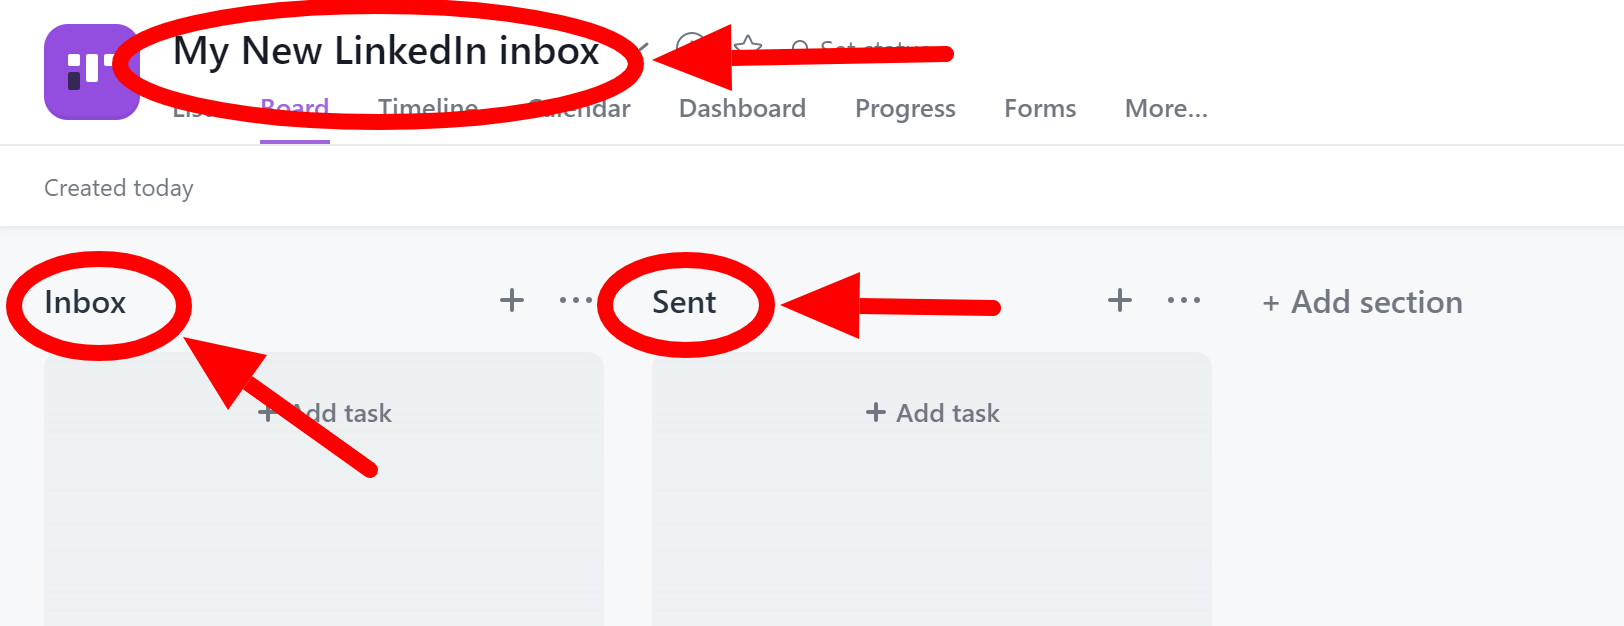
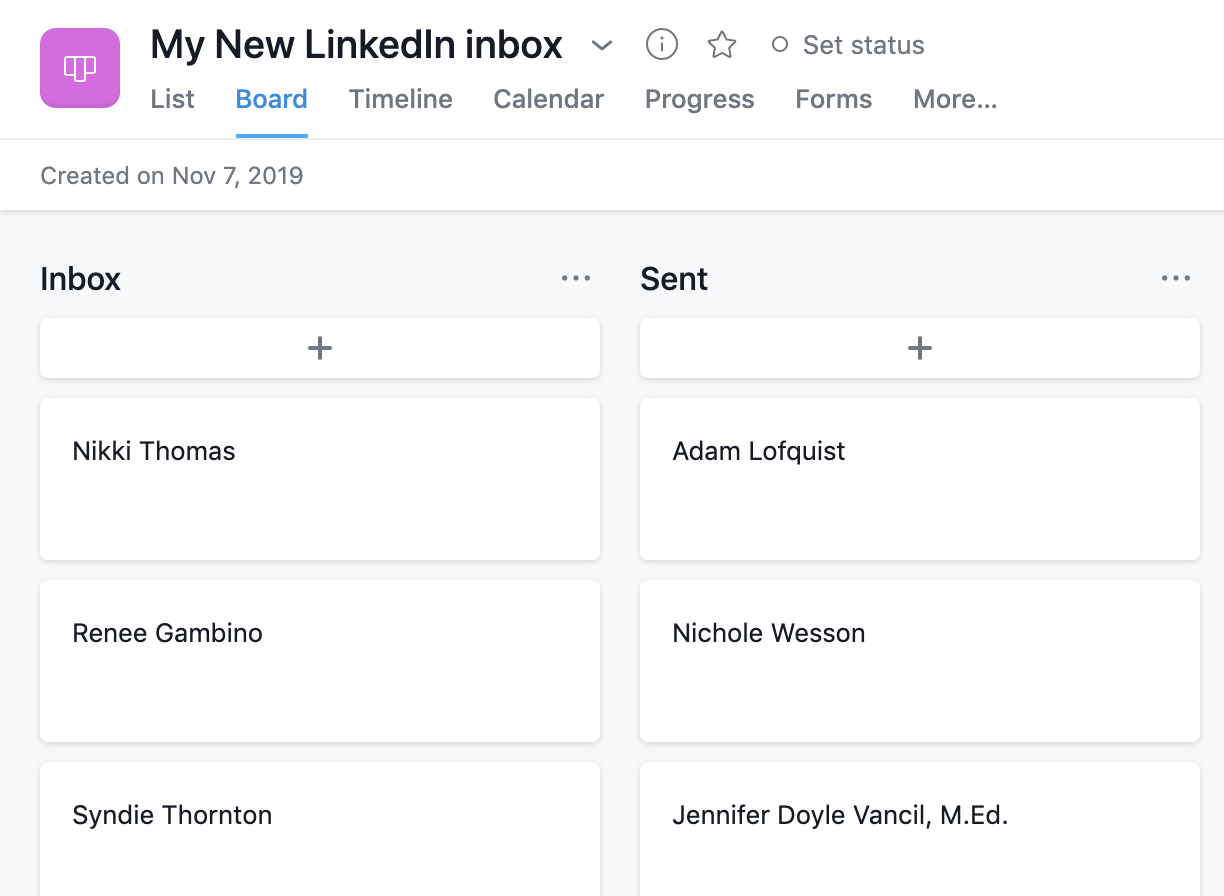
- Create an Asana account and a project called “My New LinkedIn inbox” with the “Board” as a default view.
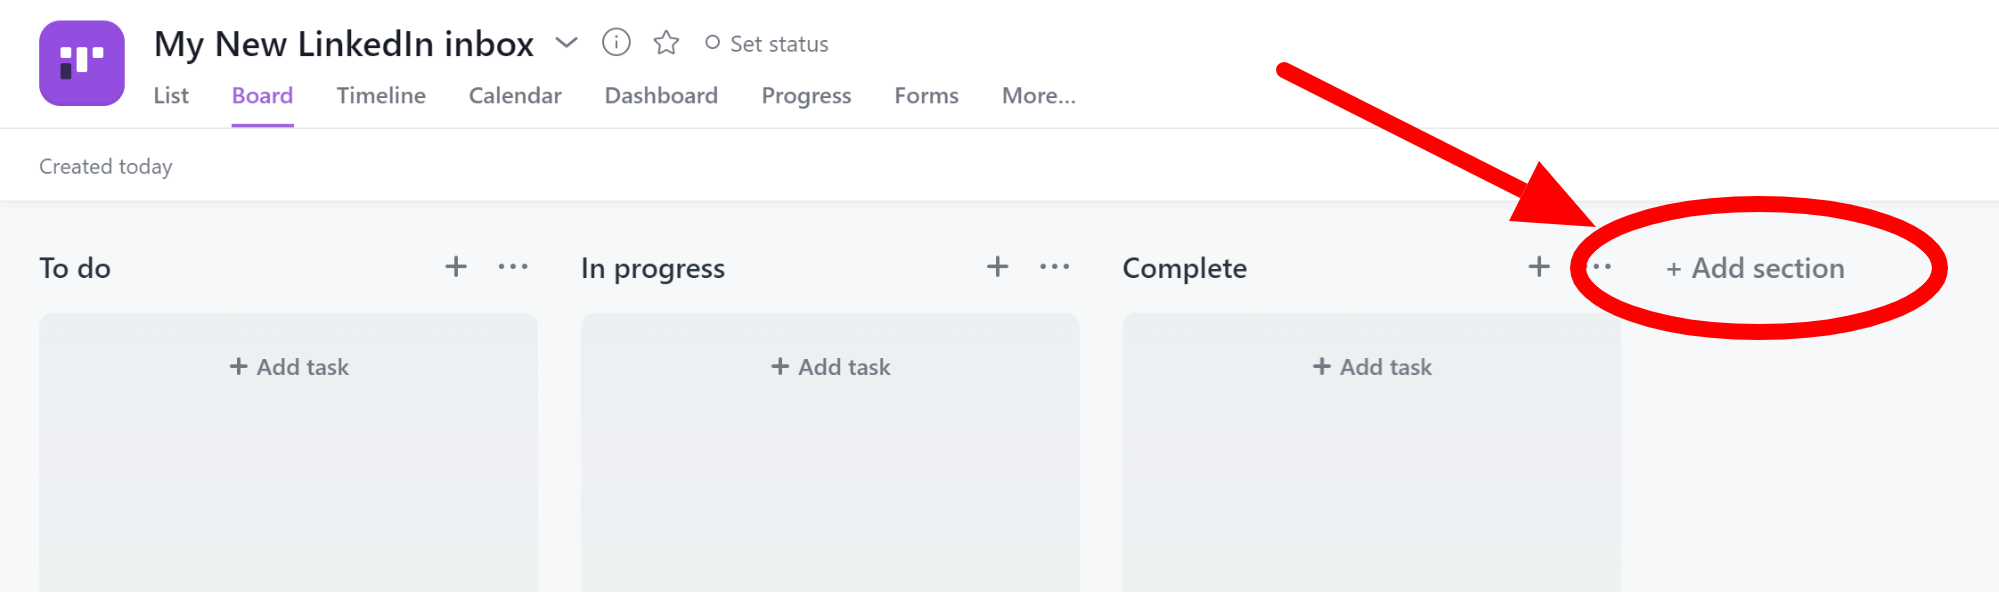
- Click the “+ Add section” button to add two new sections: one called "Inbox" for the incoming LinkedIn messages and another one called "Sent" for the sent ones.
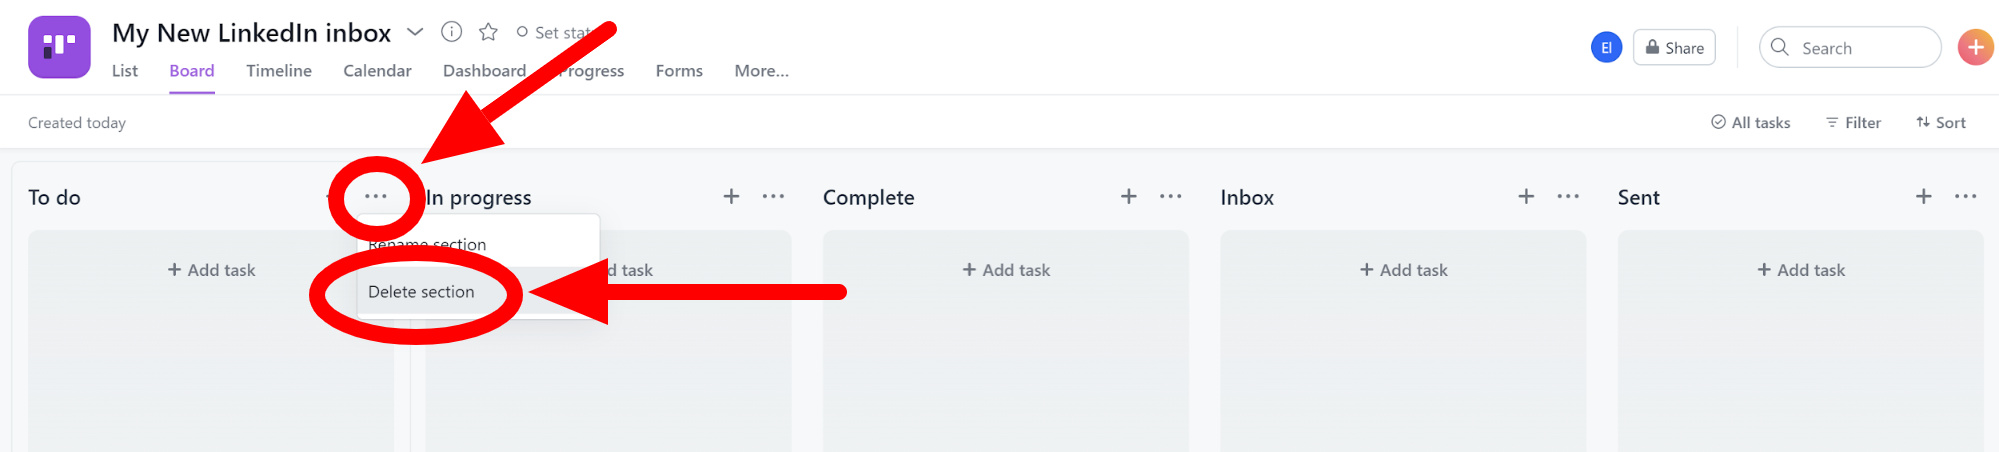
- Every new Asana project is created with the default sections “To do”, “In progress”, and “Complete”. Click the three-dots menu button and select "Delete section" to delete each of these default sections since we don’t need them in the custom LinkedIn inbox.
- Now your Asana project “My New LinkedIn inbox” is ready and contains only two sections, the “Inbox” and the “Sent” one.
How do we make LinkedIn send messages to our new project in Asana?
It's simple! We can just use InTouch Tool (opens new window) for that. It's a Chrome extension that automates connecting people on LinkedIn and sending them sequences of messages. And it can also redirect all the LinkedIn replies to any software of your choice.
Note that it will only organize the replies from people you've reached out to using InTouch Tool. The next steps describe how to install the InTouch Tool (opens new window) Chrome extension.
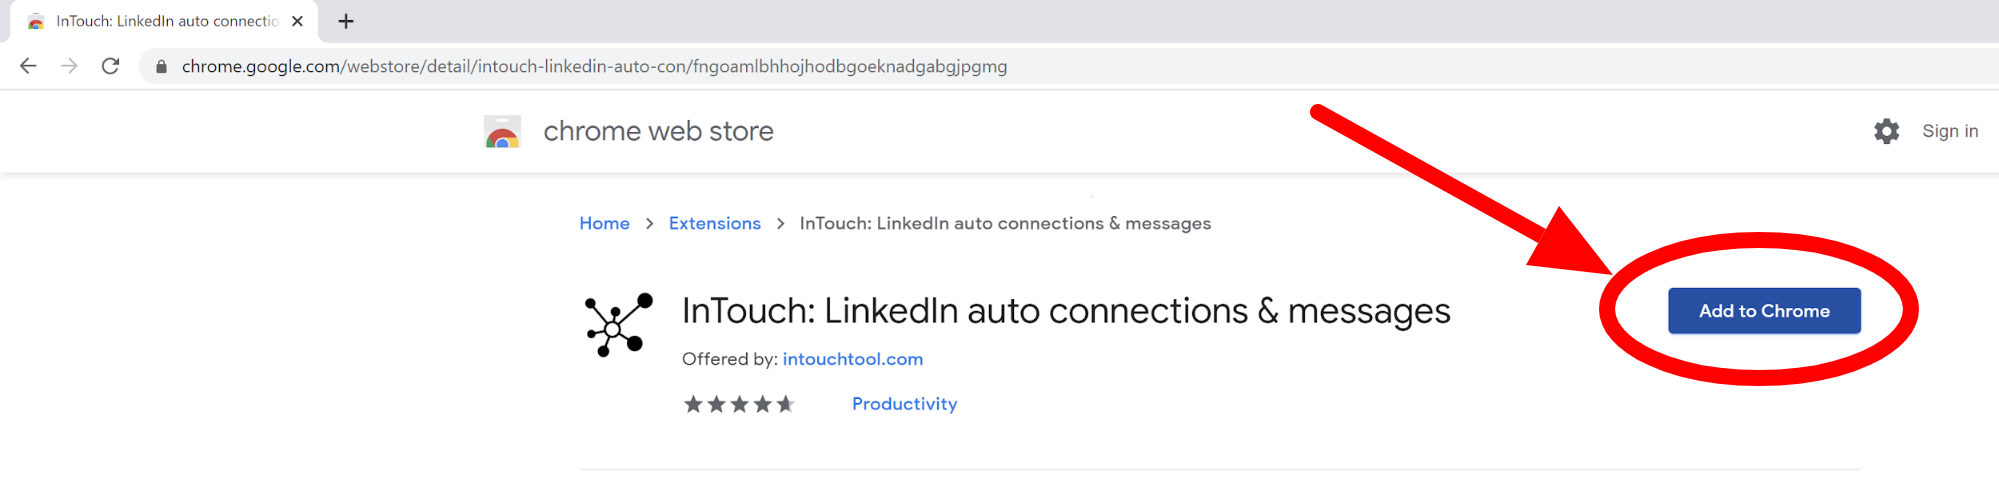
- Use this link (opens new window) to open InTouch Tool page in the Chrome Web Store. Click “Add to Chrome” to install it.
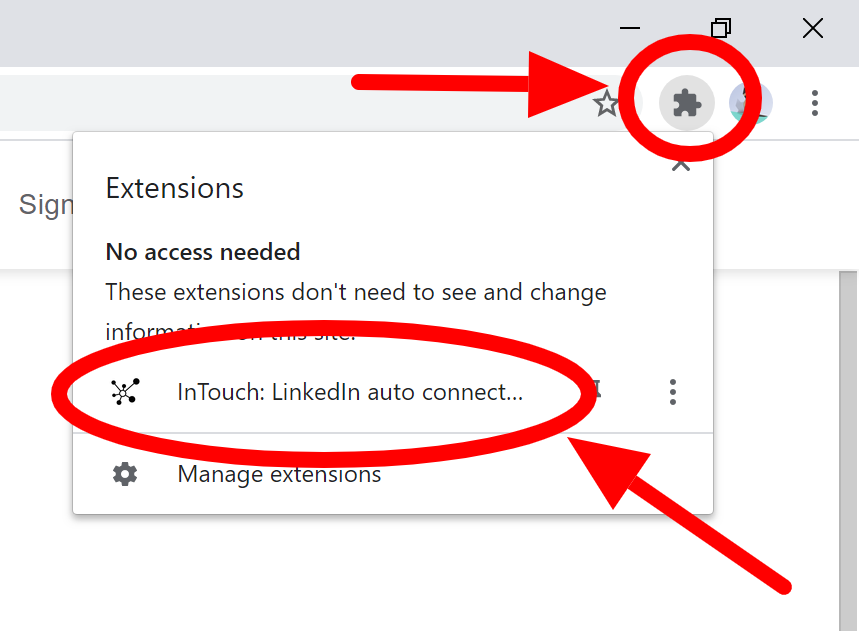
- Click the puzzle icon in the upper right corner of your web browser. It will open a popup with the list of your installed extensions. Select the InTouch Tool extension from the list. The InTouch Tool popup will be opened.
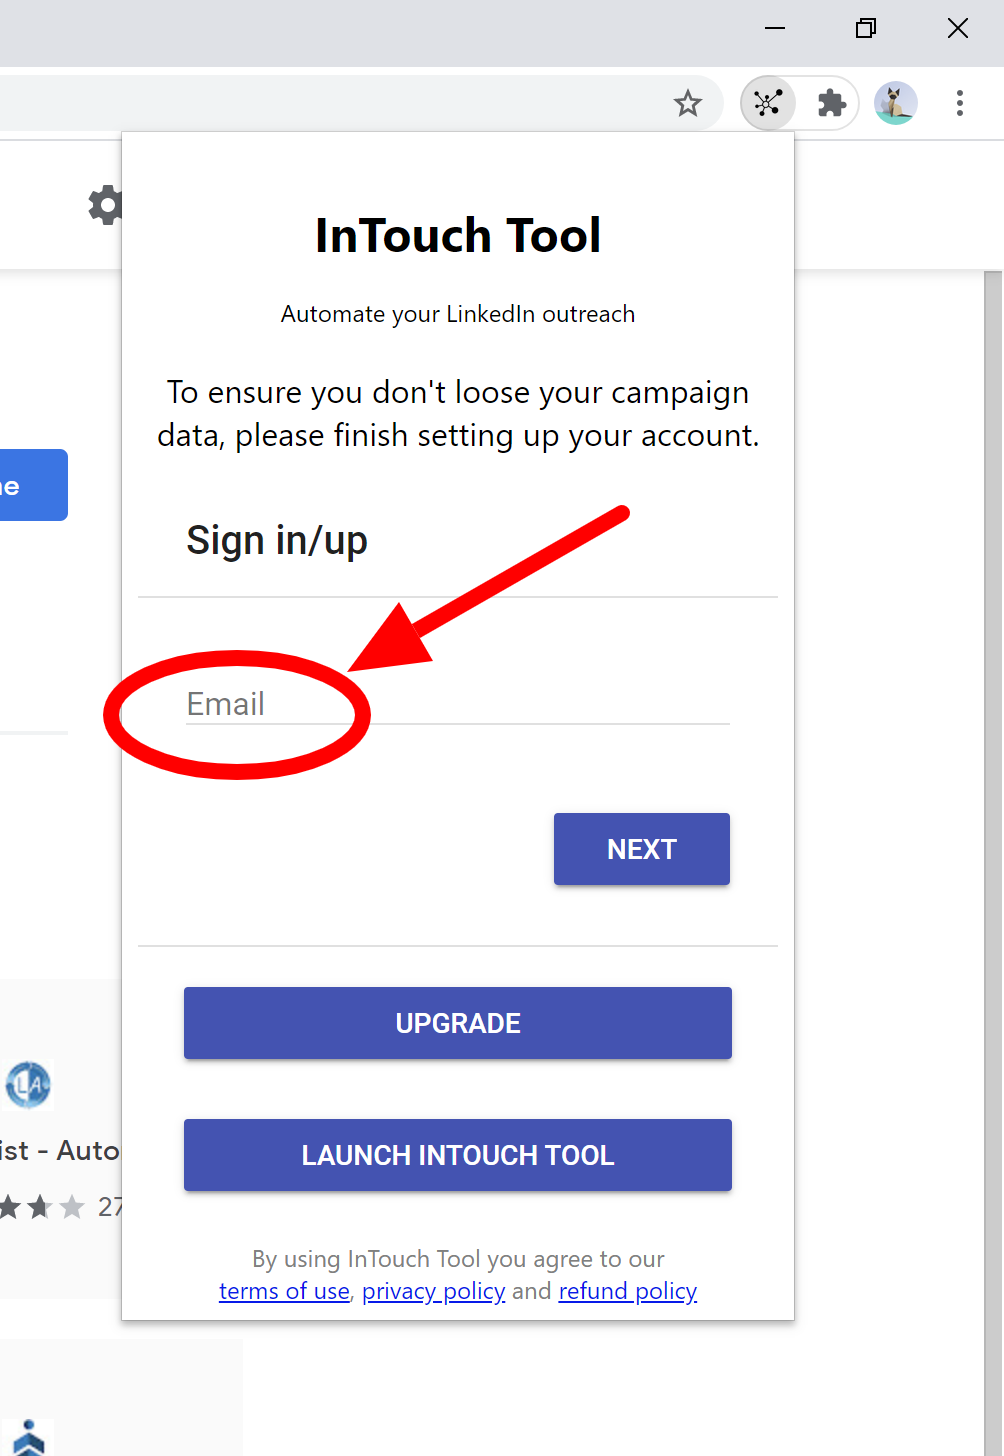
- Enter your email and some password to create an InTouch Tool account. You will have to enter your InTouch Tool credentials in one of the steps below so make sure to remember them. Click “Save” in the popup.
Now let's see how to connect Asana with InTouch Tool.
Connect InTouch Tool with Asana using Zapier so all the LinkedIn replies go to your organized inbox
Now as everything is installed let's get to the fun part.
Zapier is software with a free tier that can connect thousands of different applications together. In the following steps, we use Zapier to connect InTouch Tool (opens new window) with Asana.
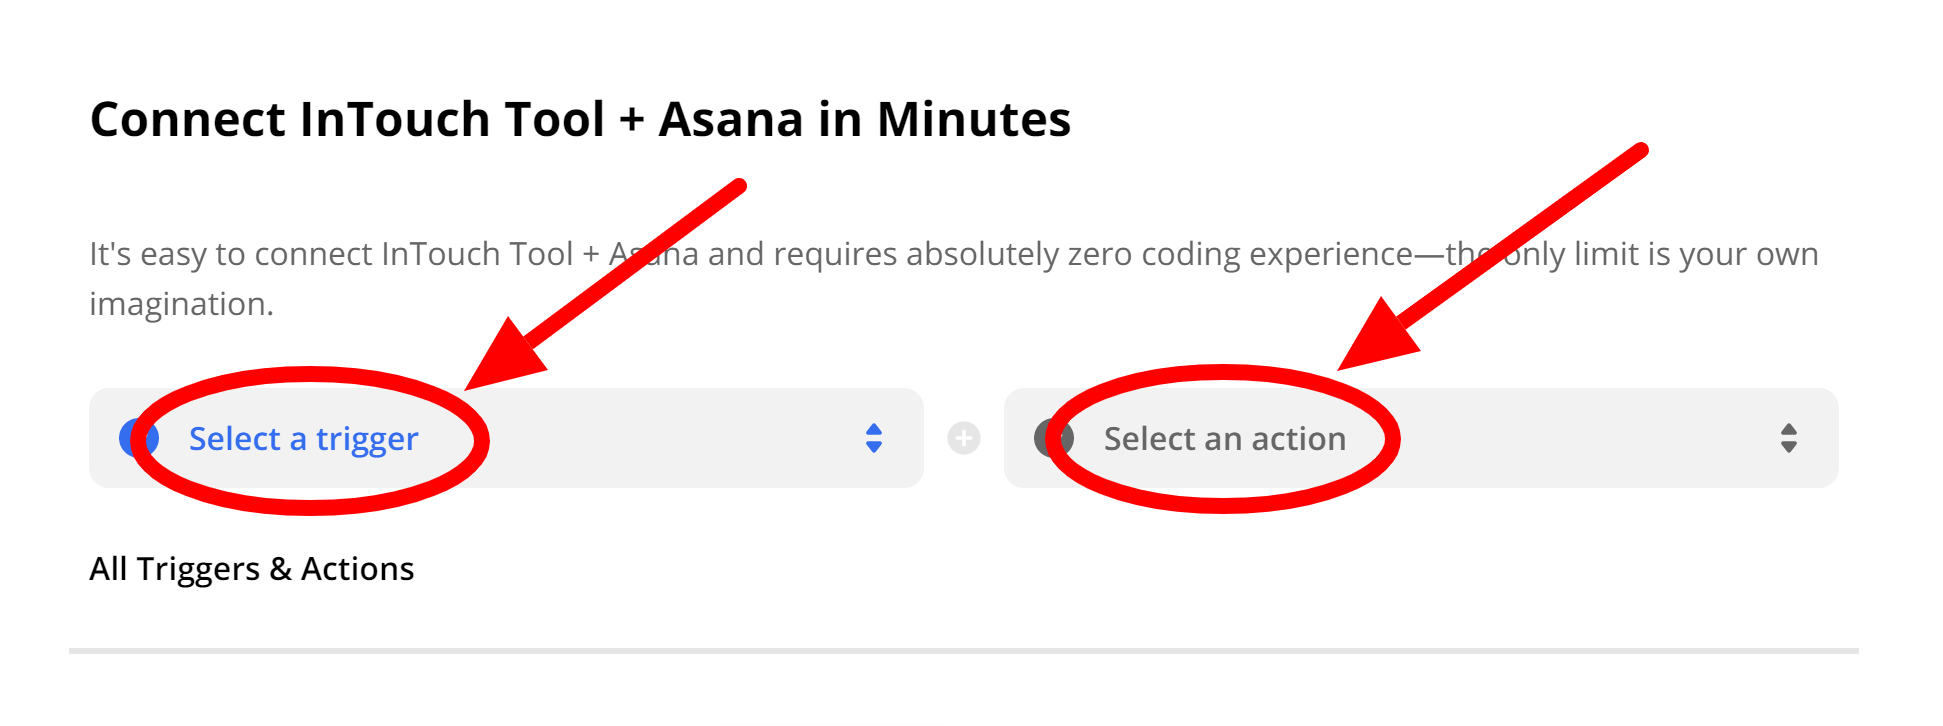
- Click this integration link (opens new window) and scroll down to the “Connect InTouch Tool + Asana in Minutes” section.
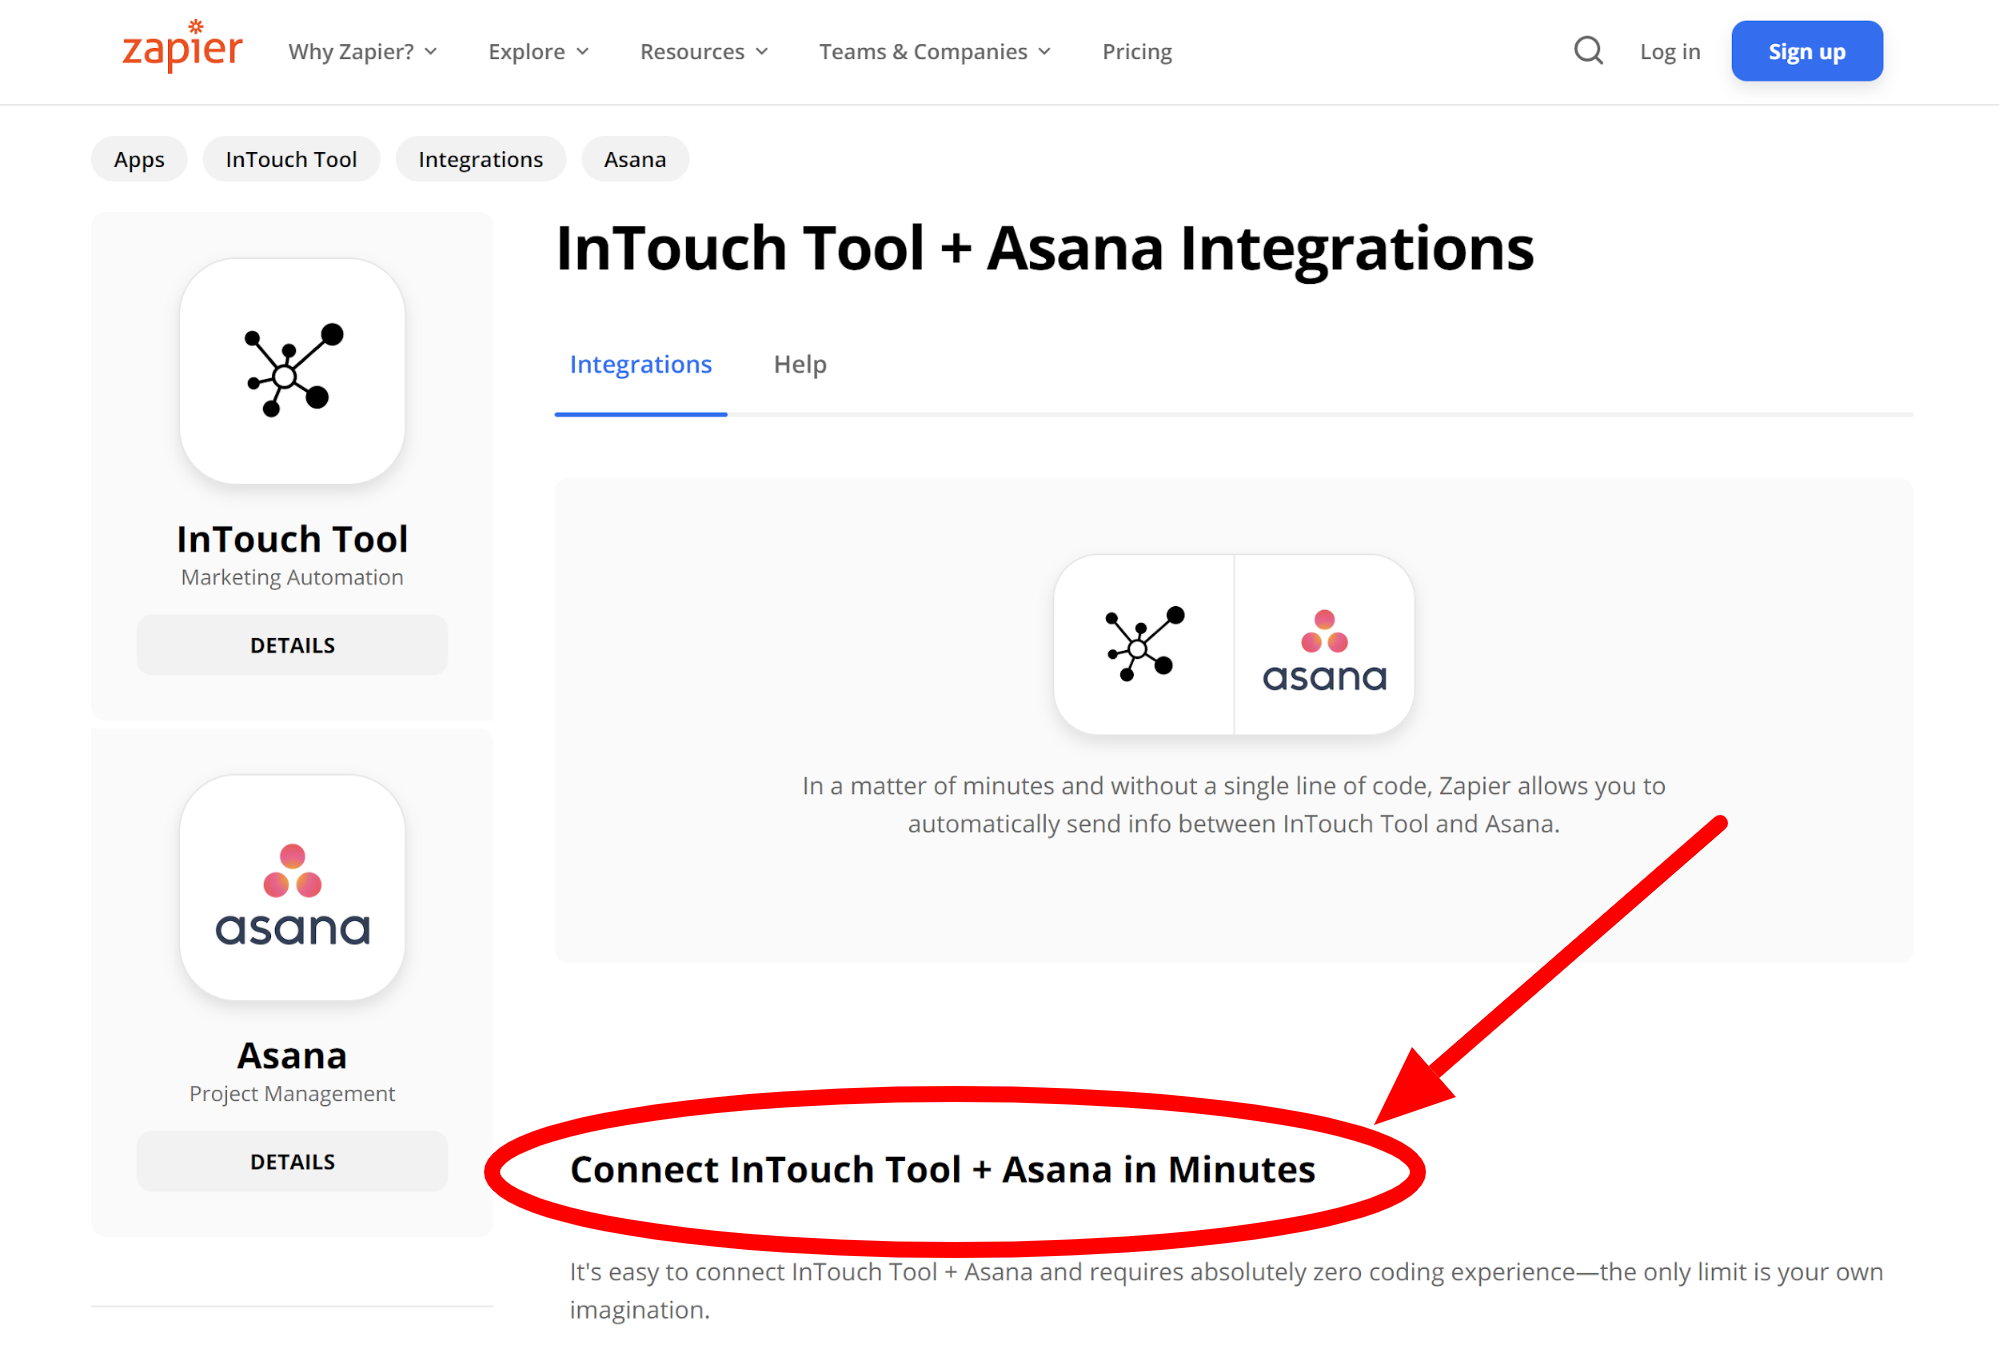
- There are two fields in the “Connect InTouch Tool + Asana in Minutes” section: “Select a trigger” and “Select an action”.
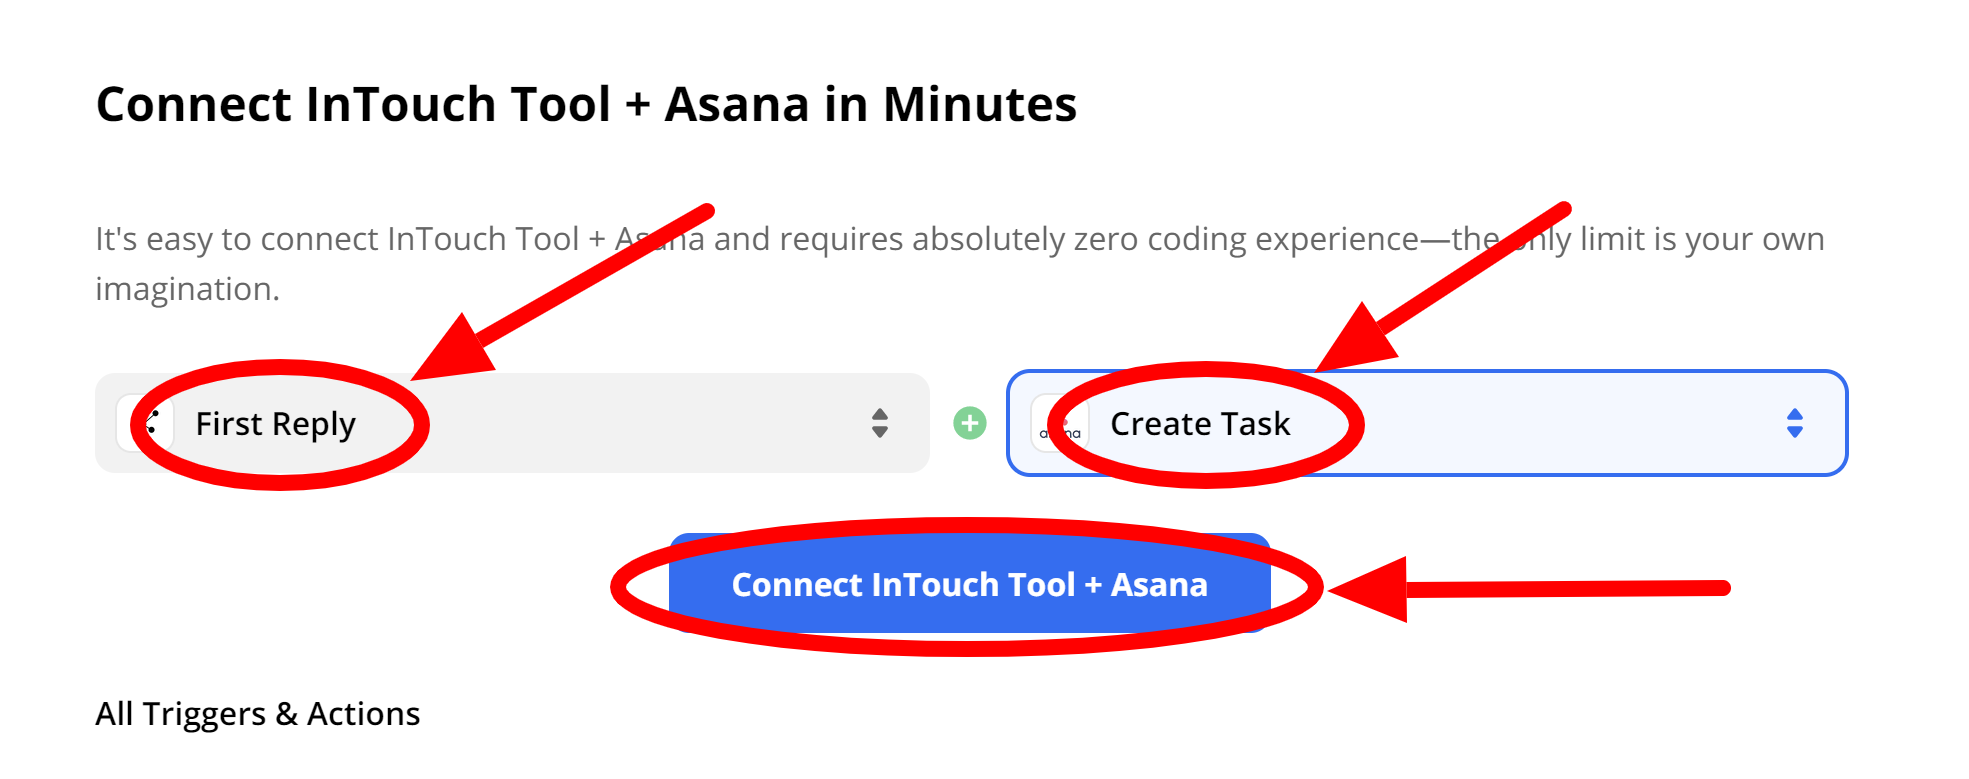
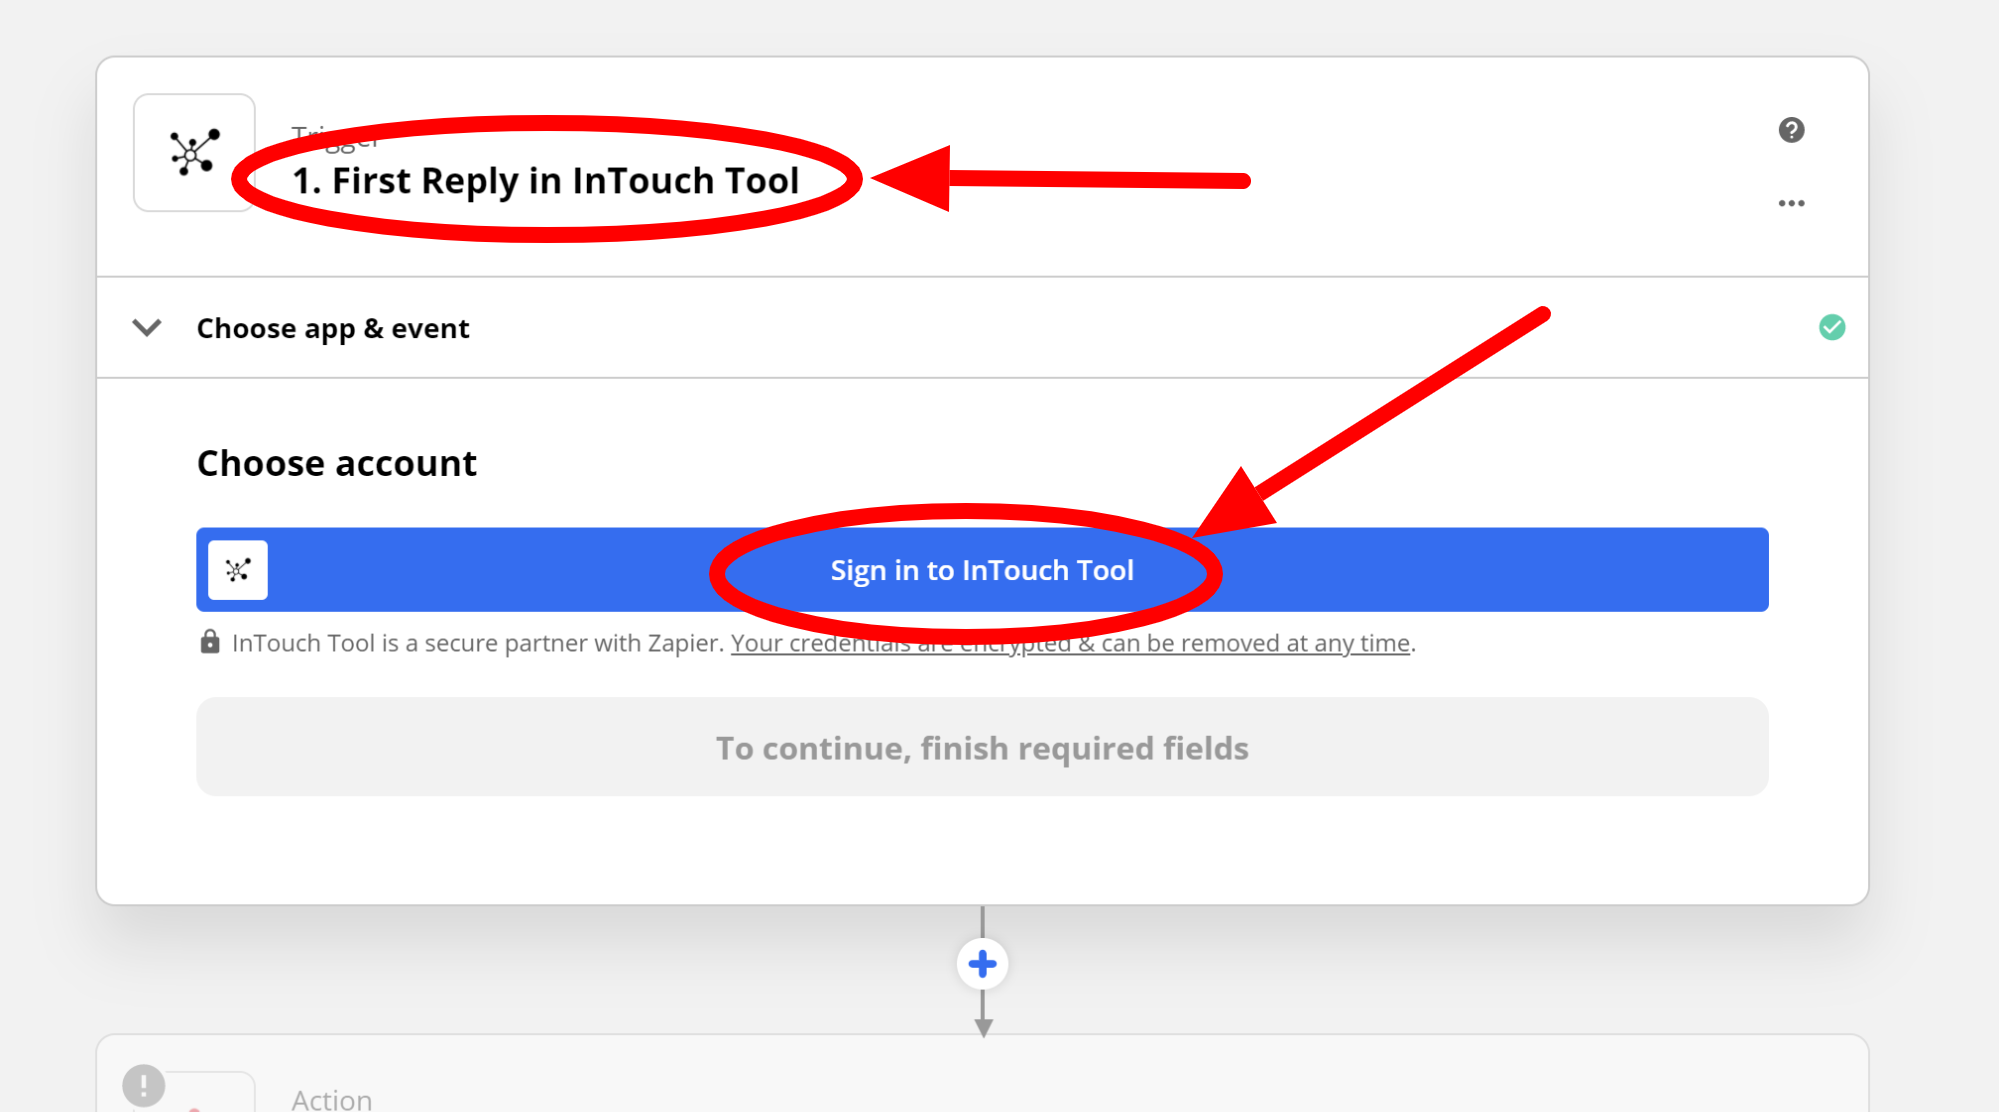
- Select “First Reply” as a trigger and “Create Task” as an action. Click the “Connect InTouch Tool + Asana” button.
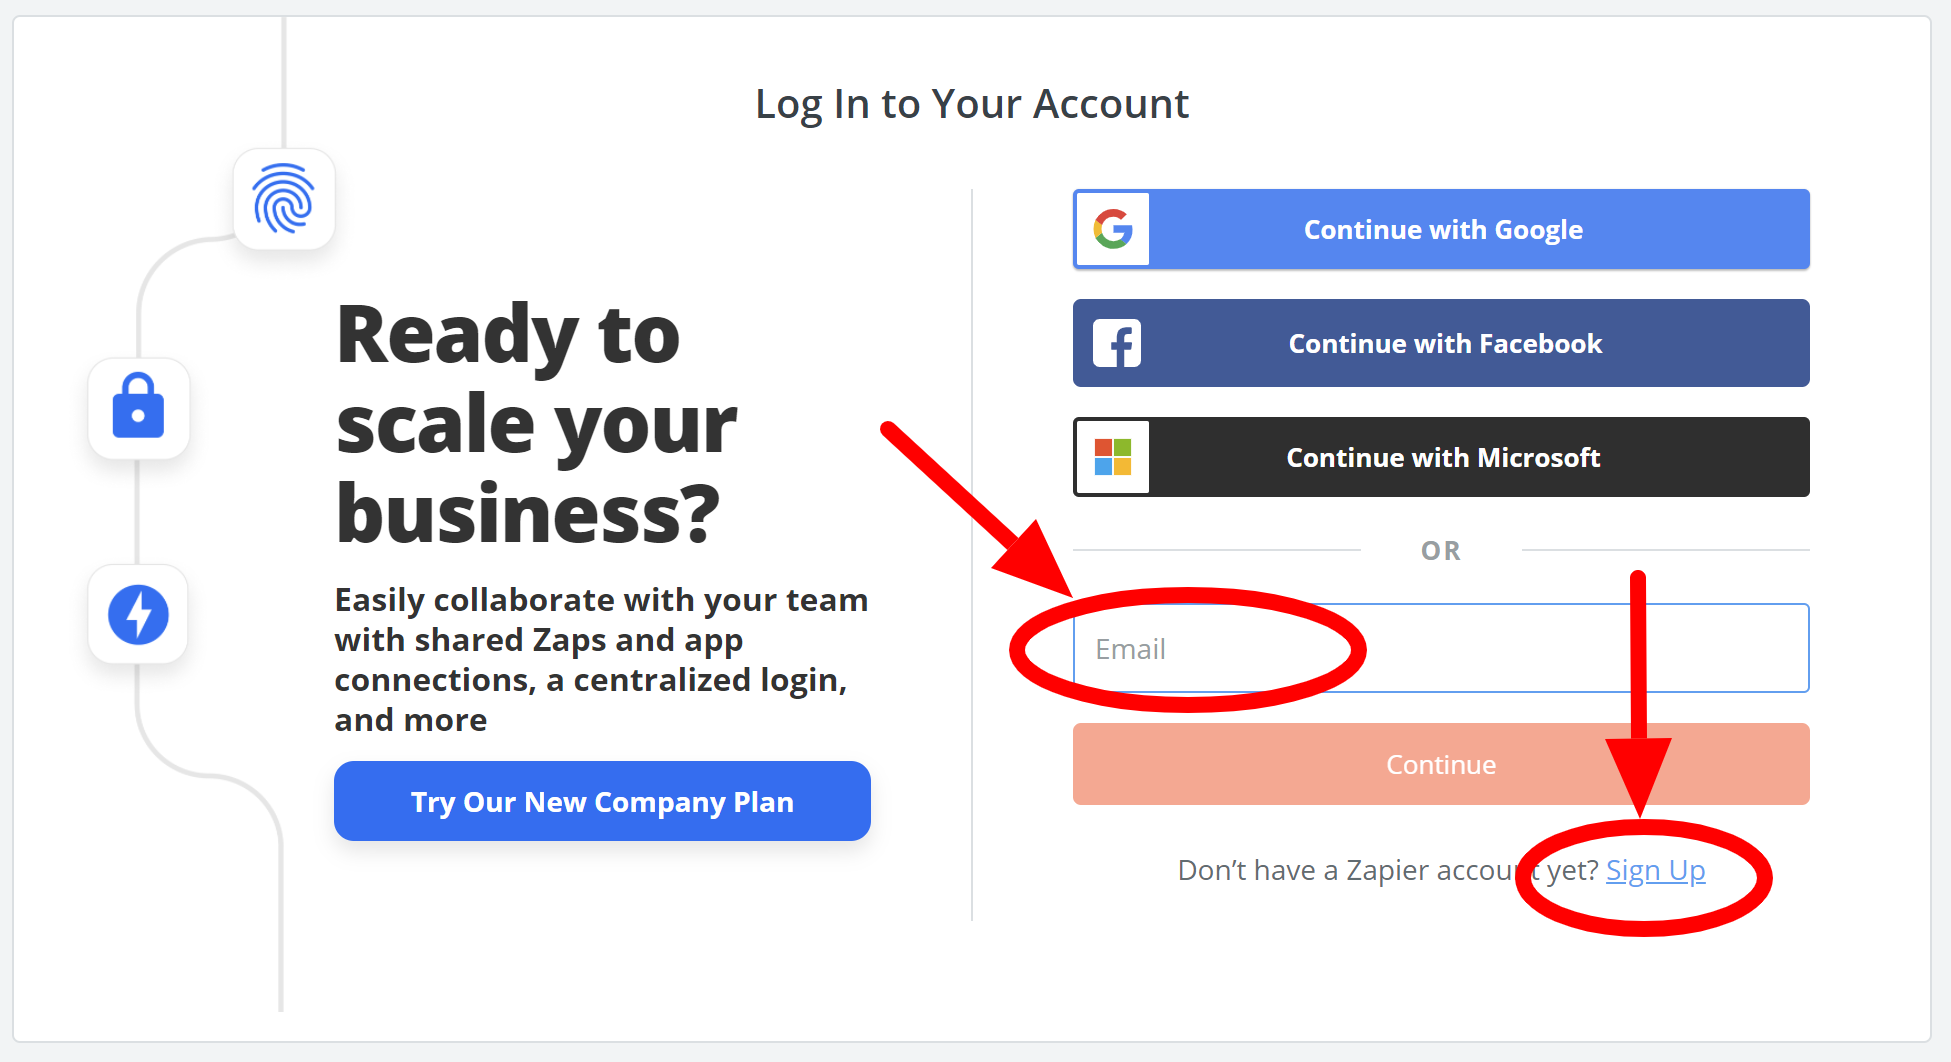
- Log in to your Zapier account or create a new one.
- Click “Sign in to InTouch Tool” in the “First Reply in InTouch Tool” section. A new window will be opened.
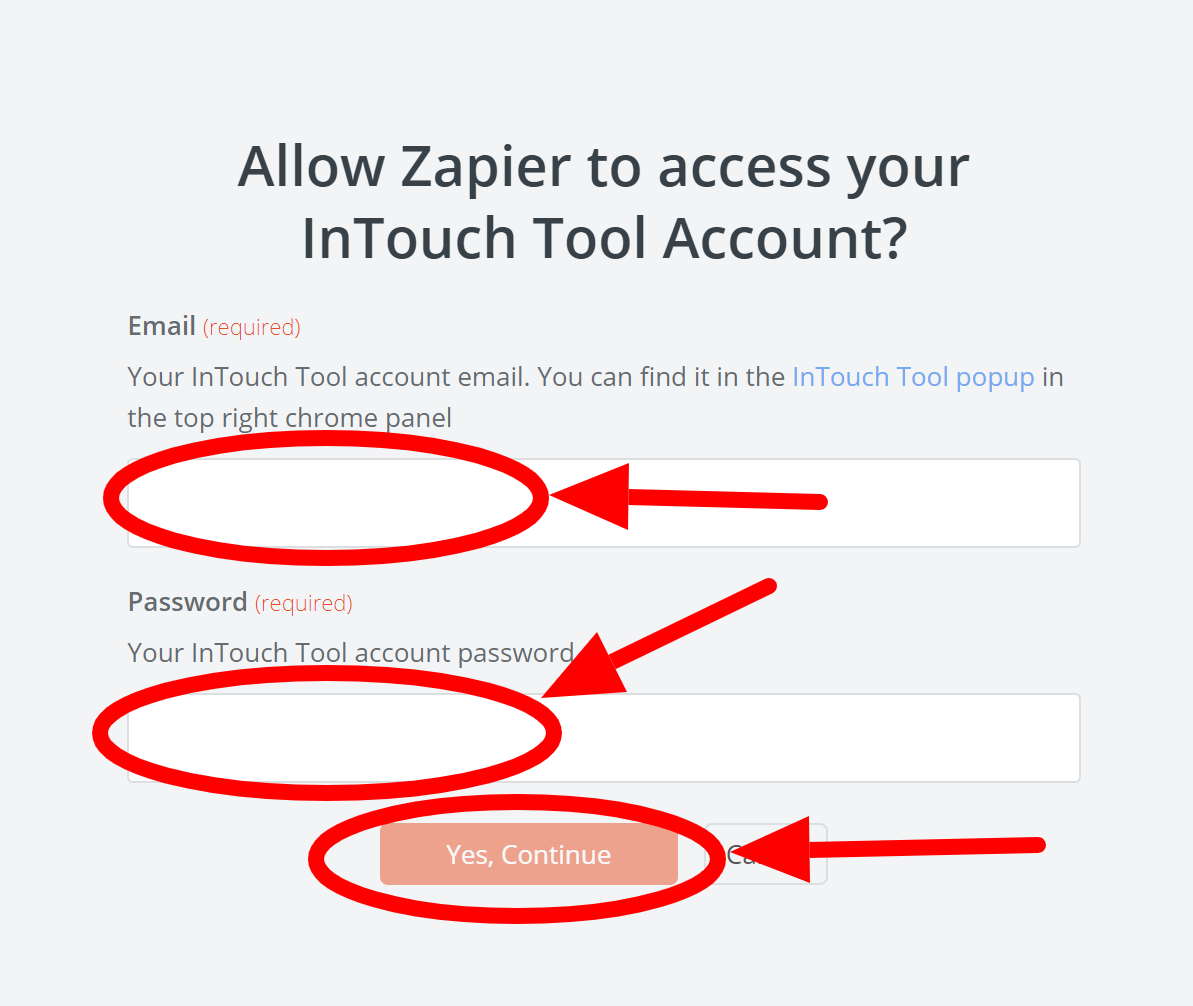
- Enter your InTouch Tool email and password in the new window and click “Yes, Continue”. This new window will be closed.
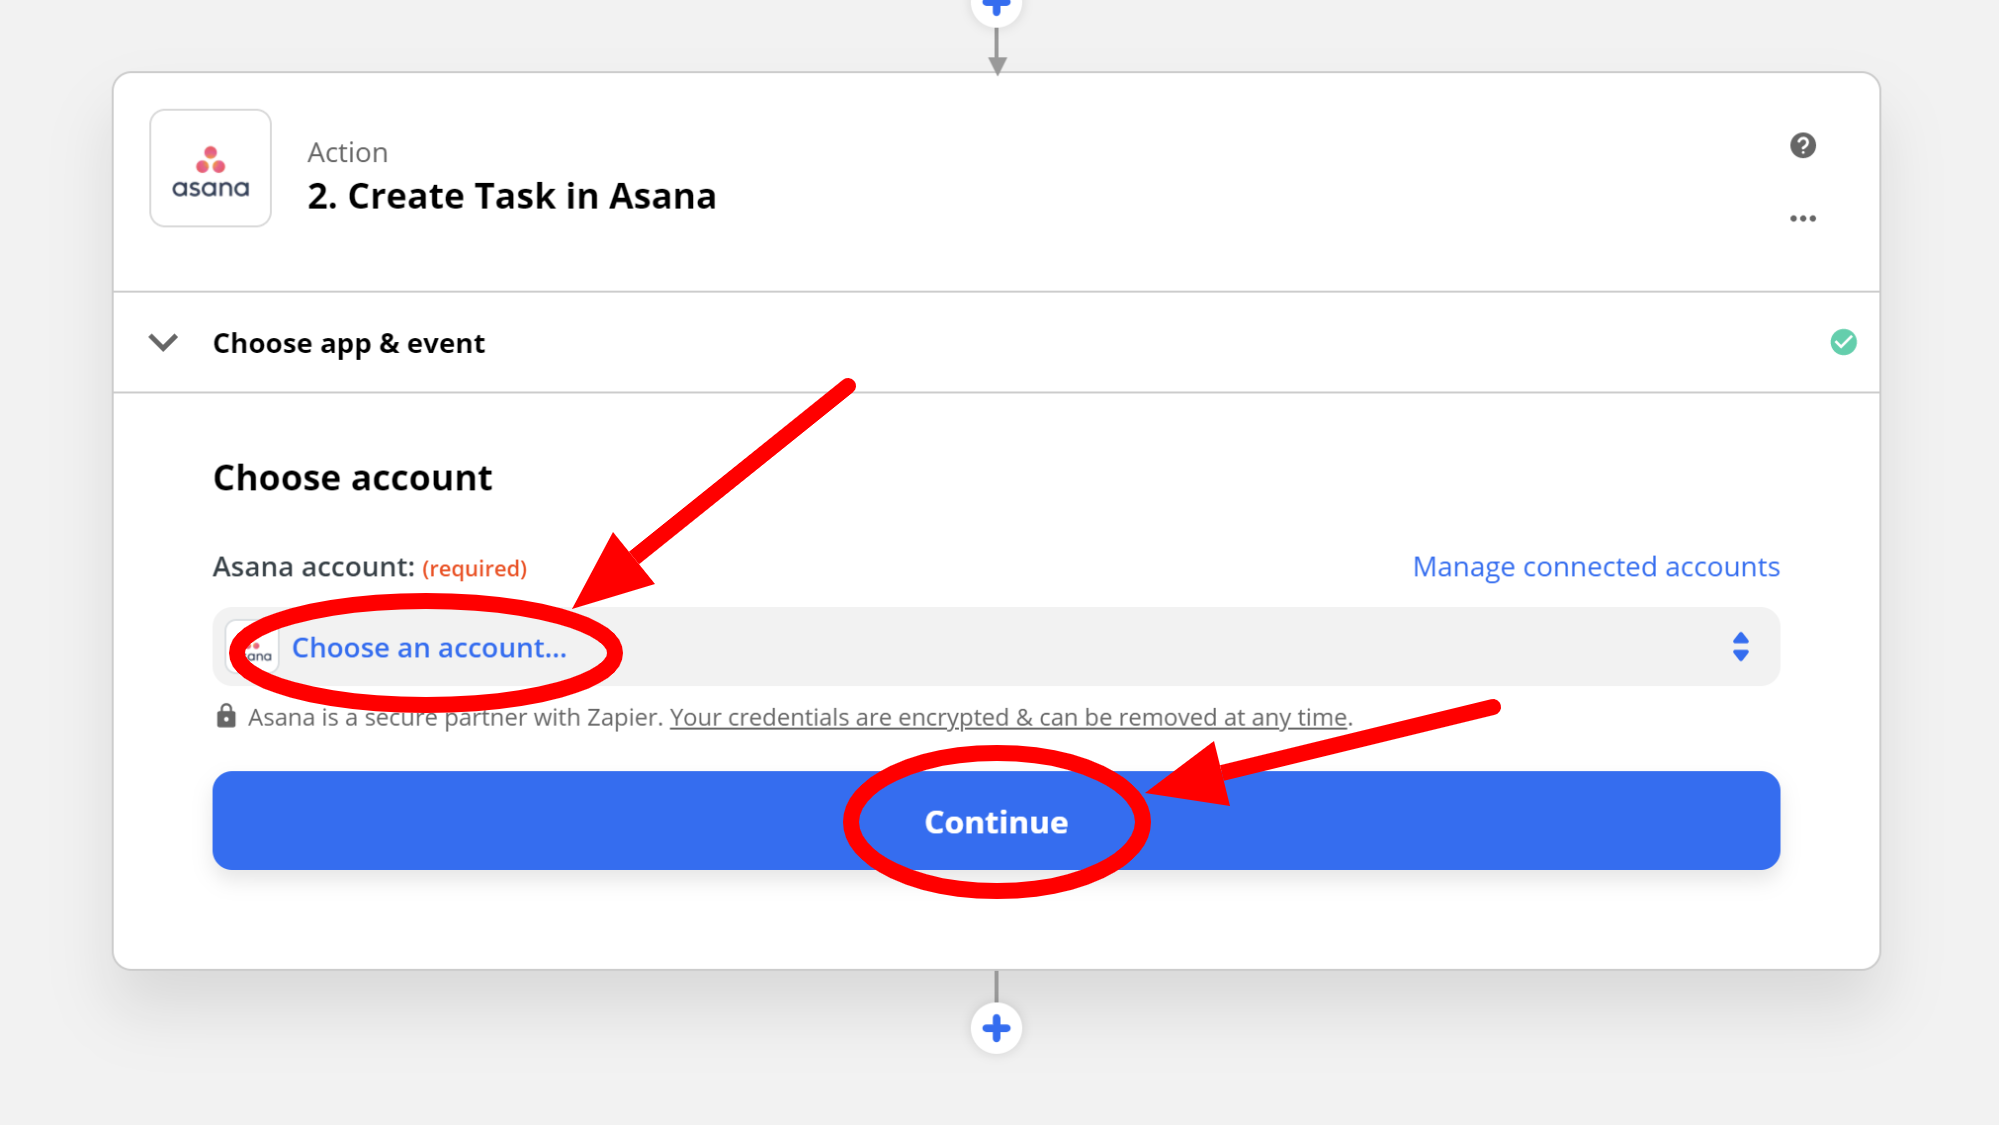
- Click “Choose an account...” and select your InTouch Tool account. Click “Continue” and “Test trigger”.

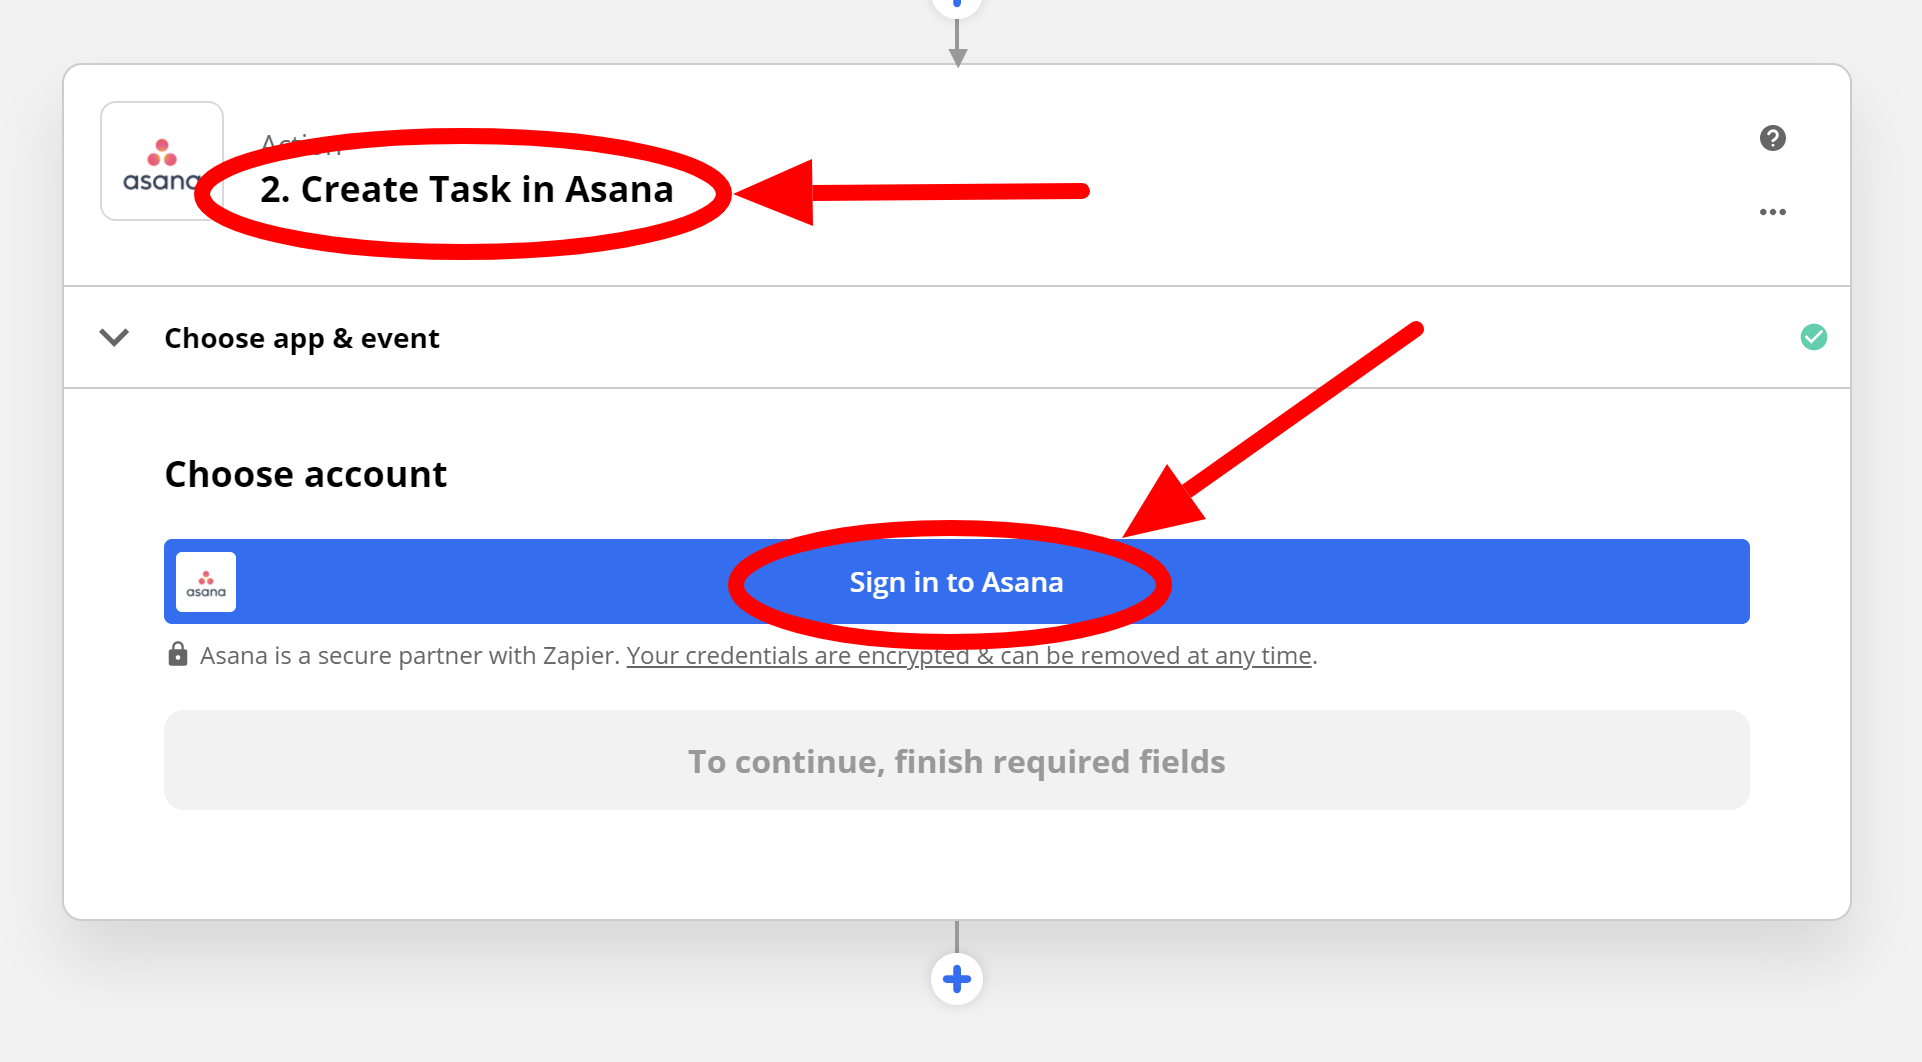
- Now move to the “Create Task in Asana” section. Click “Sign in to Asana”. A new window will be opened.
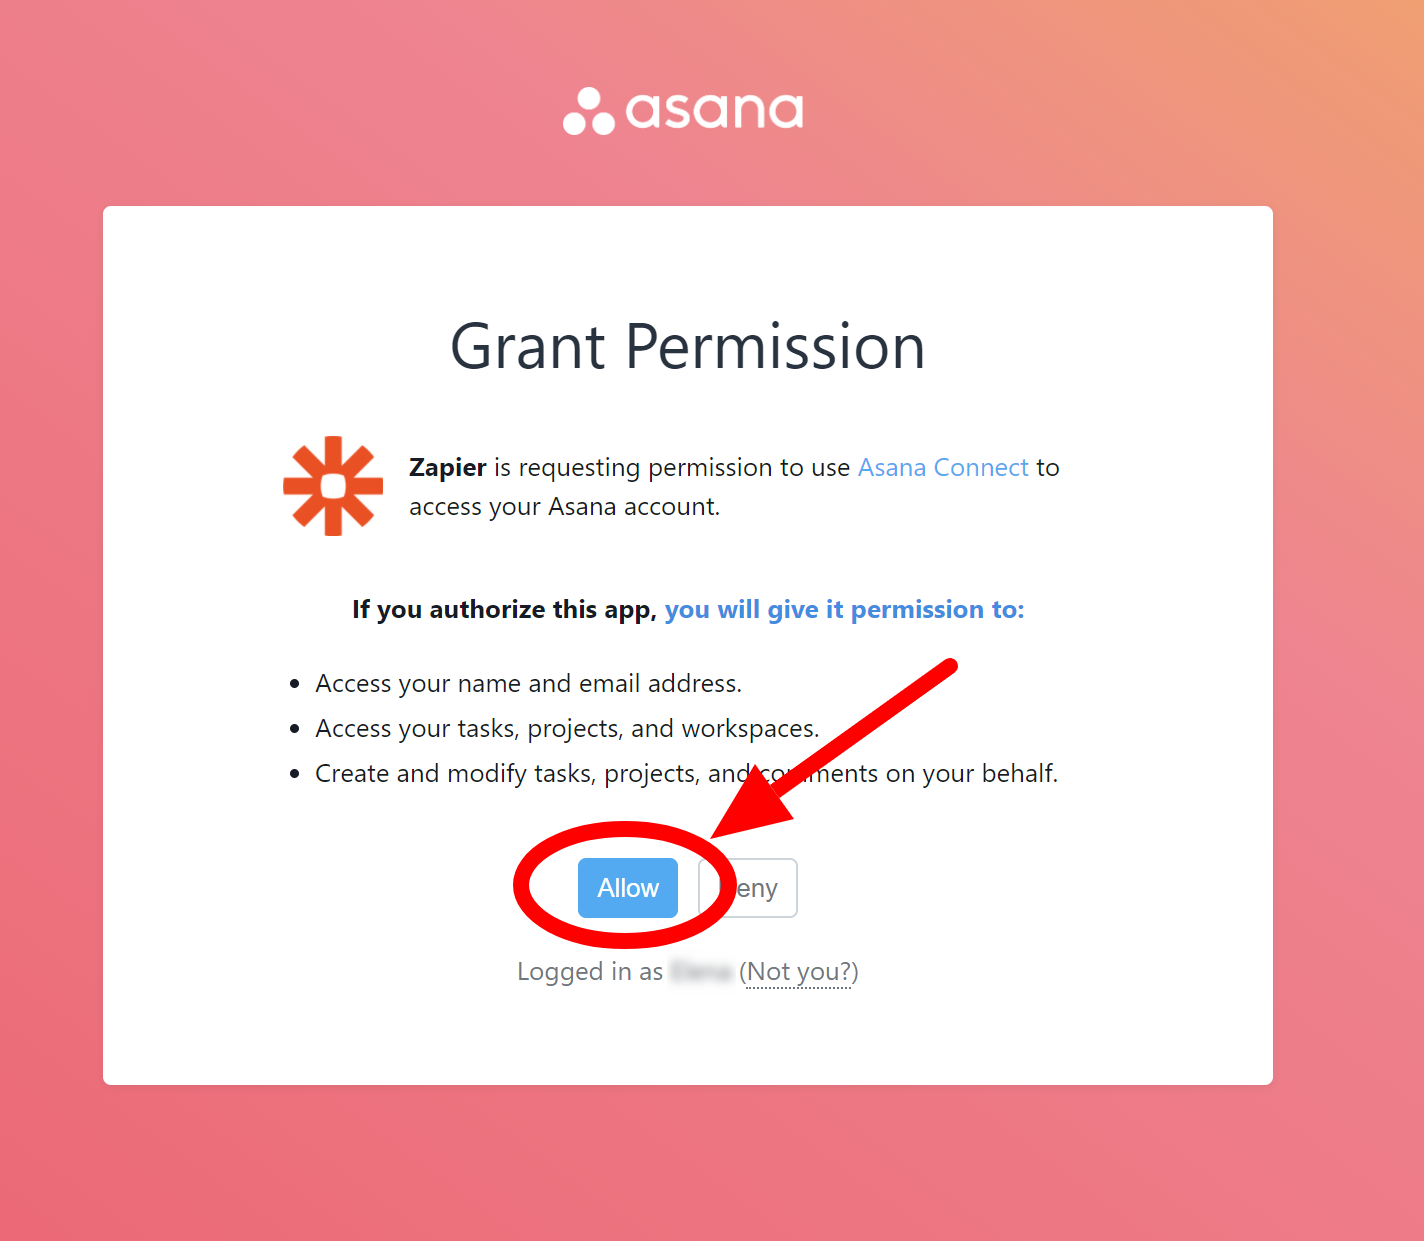
- Click “Allow” in the new window. This will allow Zapier to access your new Asana project.
- Click “Choose an account…” and select your Asana project. Click “Continue”.
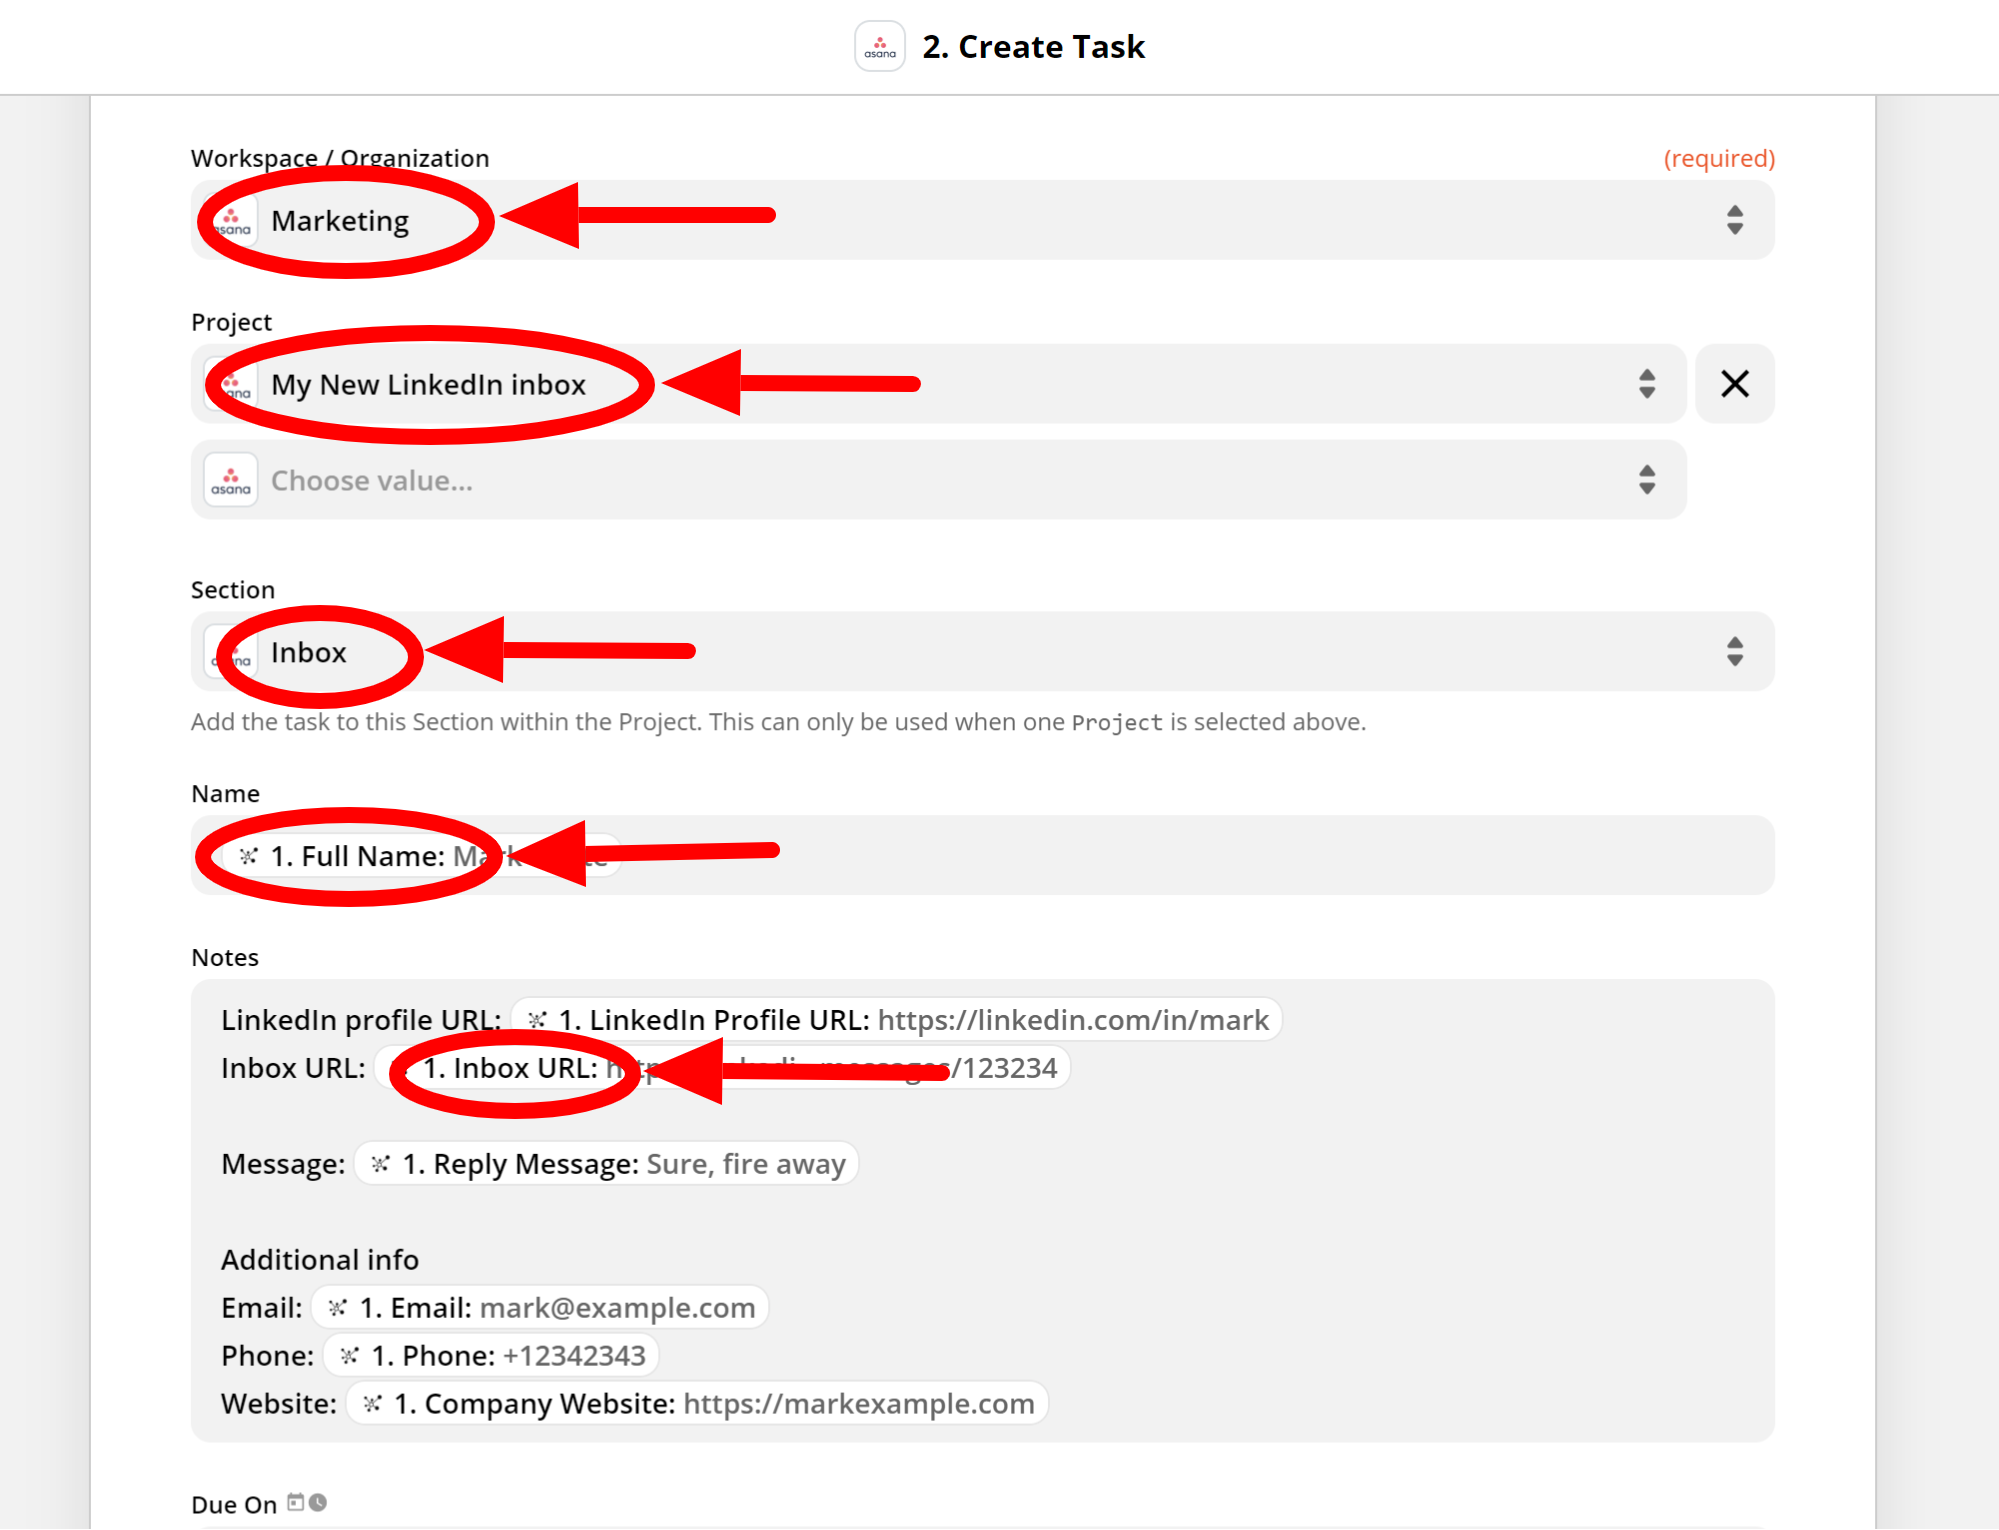
- Now specify your Asana workspace, enter “My New LinkedIn inbox” in the Project field, and “Inbox” in the Section field. Select “Full Name” in the Name field. You can configure what additional information about each reply you would like to see in your new inbox. For instance, enter “LinkedIn Profile URL”, “Inbox URL”, “Reply Message”, and “Email”, like on the screenshot below. The “Inbox URL” information is important as it will allow you to easily get back to the conversation right in LinkedIn. Finish configuration by clicking “Continue”, “Test and Continue”, and “Turn on Zap”.
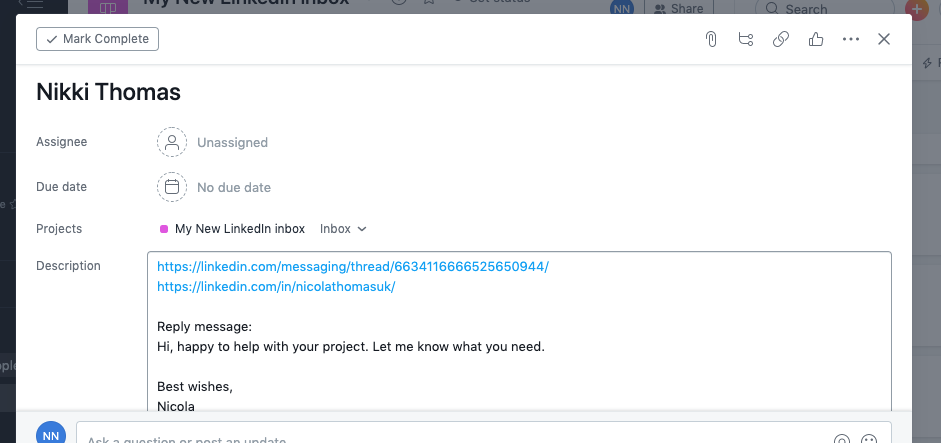
Now every time you run InTouch Tool (opens new window), it will check for replies and send them to your "Inbox" section in Asana by creating an entry. Just open the entry, click the “Inbox URL” link to open the LinkedIn conversation and reply back on LinkedIn.
Once you’ve replied, return back to Asana and move the entry from the “Inbox” to “Sent”.
This allows you to keep track of everyone who’d replied to you on LinkedIn right from Asana.
You can customize this inbox further and add additional sections like "follow up", "interested", etc.
That's it for today! Reach out to us at support@intouchtool.com if you have any questions or suggestions.